
Showing posts with label guest post. Show all posts
Showing posts with label guest post. Show all posts
Thursday, August 30, 2012
Guest Post over on Luv My Lacquer
Hey dolls! I just wanted to let you all know that I have a guest post over on Luv My Lacquer today. Jess is pretty amazing and I was thrilled when she asked me to provide a post as she spends time with her precious new arrival, Gabby. The jelly sandwich I came up with is pretty epic and probably one of my favorites thus far! Please head over to her blog to check out the guest post and the polishes I used for this look.
Saturday, August 25, 2012
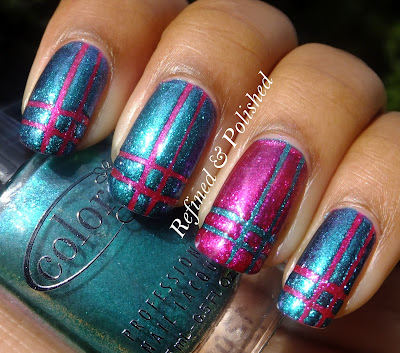
Guest Post on Karinea0a ~ Plaid Mani
Tuesday, June 26, 2012
Guest Post ~ Jossie from Pinkbeauty
I was really excited when KayJay asked me to do a guest post. She is a sweet girl and we met because I entered a contest she was having and I won! Anyhow, this is the mani: a gradient made with Forever21 Love and Beauty Sunset Gold and Pink. I really love this mani because it looks so girly!


Thank you KayJay for letting me do a guest post on your awesome blog! And I wish you success and love in all that you do.
~~~~~~~~~~~~~
Jossie is such a sweetheart. I am loving this gradient! Please don't tell me I'm going to have to start going into Forever21 to look for polishes (I generally despise that place). The last picture looks so cool! Please be sure to check out Jossie over at Pinkbeauty.
This was the last in the installment of the guest posts! Hope you're looking forward to seeing my nails again!
Monday, June 25, 2012
Guest Post ~ Enamel Girl
My first guest post! Today I'm sharing a lovely Indie polish with you by Enchanted Polish. Unfortunately I don't own a lot of Indie's (because they're usually gone by the time I get to their sale) but I was lucky enough to grab Austin Powers from Llarowe's website. I was doubtful at first because I thought it was kinda pricey for an Indie and all, but I'm so happy I grabbed this one up! It's a multi-colored holographic polish.

I was wearing Nicoly by OPI's

Indoors it appears more golden but then it awakens in the sunlight.

Outdoors it really lightens up.

Needless to say I'm very happy with this purchase! Thanks to Refined and Polished for allowing me to do a guest post. :)
~~~~~~~
Thanks so much doll! This is a gorgeous holo. I don't know if I've ever seen a gold holo before, but this one is really pretty! Enamel Girl has the most awesome swatches, nail art, and stamping so make sure you check her blog out.
Friday, June 22, 2012
Guest Post ~ Anutka from Wacky Laki
Hey dolls, I've always wanted to say that! My name is Anutka from Wacky Laki and I'm excited to be guest posting here
today. I have wanted to try a glitter jelly sandwich with Color Club Chelsea
Girl for a while and this seemed like the perfect occasion. There is
something about the depth of a jelly glitter sandwich that I love. I've decided
to name this one blueberry jam :)
I started out with two coats of Chelsea Girl, which is a bright
blue sheer jelly from the POPtastic collection. Two coats of Wet 'n Wild Party
of Five Glitters then followed before adding the final coat of Chelsea Girl.
For some fun sparkle on top, I added Pure Ice Oh Baby!

Party of Five Glitters is a great mix of different size and shape
glitters. It is not something I would wear on its own, but it is my favorite
for sandwiches such as this. I love seeing how the color of the jelly polish
changes the glitter. It is a mystery every time. The only thing I don't like
about this glitter is how thick and goopy the clear base is...

Pure Ice Oh Baby! is a green to
purple duo-chrome shimmer in a milky base. It works well as a topper
and adds a fun kick to a manicure. Sadly it usually doesn't photograph well,
but it is lovely in real life...


Thanks Lakeisha for inviting me to guest post here today while you
finish up your studies! Good luck and hurry back! :)
I hope you all enjoy this manicure.
Thanks for looking!
Anutka :)
~~~~~~~~~~~~~~~~~~
Anutka, you know you can say doll whenever you like! I just love this jelly sandwich and I can't wait to try and recreate something similar. I'm so glad I didn't swap Party of Five glitters out...I won't wear it alone, but it is great for jelly sandwiches! I really admire Anutka's blog and her style. Everything about her photos and nail art are impeccable so make sure you check out Wacky Laki!
Wednesday, June 20, 2012
Guest Post ~ Steph from Imperfectly Painted
Hello! This is Steph from Imperfectly Painted. One of my favorite recent trends is the accent nail. You want to know why? Let’s face it, I’m nail art challenged. There are many talented nail art ladies out there that I give props to, but for me, the less hassle the better. This is exactly why I love an accent nail. An accent nail is a fun way to be creative with polish without having to commit your time and patience to nail art. The following is a recent accent nail manicure I did that I loved.

I want to thank Lakeisha for the opportunity to guest post for her. She is one of the kindest bloggers I know. Best wishes to her with the completion of her dissertation and doctoral degree!
~~~~~~~~~~~
Super cute mani Steph! You know I love an accent nail as well. I love the look of nail art on accent nails for two reasons: I'm lazy and sometimes nail art on all fingers looks a bit busy to me. Maybe we can tackle a few nail art trends together! Steph is one of the sweetest bloggers I've interacted with. If for some odd reason you've been under a rock for the last couple of years and you haven't checked out Imperfectly Painted, please take the time to do so today!
Tuesday, June 19, 2012
Guest Post ~ Gwenn from Sugar Nails
Hi dear Refined and Polished readers! I'm Gwenn from Sugar Nails and I'm very honoured to write a guest post for Lakeisha today! If you know my blog, you may know that I absolutely love to make gradient nails. So for this post, I decided to go for something I wanted to try for a long time: a holo gradient!
I used the wonderful Saint George by A England as the base, then applied some of it and some Color Club Wild at Heart on a makeup sponge and sponged my nails with that combo. Here's how it looked:


I like purple and green together and I loved how the holo hues mixed together. What do you think ?
On the next day, I wanted to add some stamping and played for the first time with my Enas plates. These are different than the Konad system; on one side it's rubber with designs engraved in it, on the other side it's a metal plate with the same designs, colored, to show you what you can obtain with them. The big advantage of this system is you can take your time to work with the designs, remove some parts of the design or apply multiple colors to it. Here's a video that will show you how it works. It's really a nice system.
For this design, I used the A33 plate and China Glaze Hi Tek (the plates will work with most of the polishes that usually work with Konad). I did something simple with a single color but I removed a part of the design so my gradient wasn't totally covered. Here's the result:

It's not totally neat, but it was my first time using that system and I liked how it turned out. I especially like how my gradient shows in the little dots. :) I think I'll have a lot of fun with these plates. ;)
What do you think?
I hope you liked my post. :) Thanks again for welcoming me here. :)
~~~~~~~~~~~
Gwenn, this is absolutely stunning! I absolutely love the colors together, as they compliment each other so well. These stamping plates seem cool as well...I must look into them. I've been a reader of Gwenn's blog for a while, but we first became polish friends after I won her big 2 year anniversary giveaway. She is just the sweetest person ever! Gwenn showcases great nail art and swatches, so make sure you check out Sugar Nails.
Monday, June 18, 2012
Guest Post ~ Jessica from Luv My Lacquer
Summertime Fun Water Marble
Hello Lacquer Luvers! My name is Jessica AKA LuvMyLacquer and I am so very honored to be guest posting for KayJay today. I had no idea what I would be doing for this post but I am absolutely in love with what I came up with. So let's get to it, shall we?

While looking through my stash, I kept glancing at my Bettina's and noticed three colors with a theme. Pink Bikini, Flip Flop and Ocean were the colors and I thought to myself "after all her hard work with her dissertation, she will definitely deserve a day at the beach to just relax and have some fun!"

I began my mani with a base of Essie Grow Faster. I prepped my fingers with Eucerin, which is sort of like Vaseline. I know a lot of people use tape, but in my experience while taking off the tape I have messed up my designs. The Eucerin creates a barrier so that the polish doesn't touch your skin and makes clean-up a breeze since it just wipes off. Next, I began to drop my colors into the water to create a bullseye. Then I used a toothpick and dragged it through the polish to create this design. I dipped my nail into the polish, cleaned up the excess polish in the water with another toothpick, slowly pulled my finger out of the water and voila! I topped this mani with a coat of Good To Go by Essie.

~~~~~~~~~~~~~
Jess is such a talented polish friend! I absolutely love this color combination. It amazes me how all of the water marbles that have been done look totally different. Hopefully the beach will be in my near future because I'm definitely ready for a break. Make sure you all check Jess out at Luv My Lacquer where she does all kinds of awesome nail art!
Friday, June 15, 2012
Guest Post ~ Patricia from Southern Sister Polish
Today's guest post is from Patricia over at Southern Sister Polish. I can't even tell you how amazing her water marbles are. Just look below!
~~~~~~~~~~~
Hi everyone! Today's manicure was done because summer is just around the corner! I took a few mini Essie's I have laying around and did a water marble. I started with a base of white to make the colors really pop! The colors I used are (also in the order I put them in the water) Meet Me at Sunset, Super Bossa Nova, Smooth Sailing, Braziliant. I wasn't sure that Smooth Sailing would spread because of the shimmer in it, but it worked really well with the other colors. Here are the pictures!


Thanks for letting me guest post <3 KayJay!
~~~~~~~~~
These water marble designs just keep getting more and more amazing! This looks like it could be a decal...just gorgeous! Make sure to check out Southern Sister Polish for more of Patricia's nails (along with her sister who is pretty amazing as well).
Thursday, June 14, 2012
Guest Post ~ Destany from Confessions of a Sarcastic Mom
Today's guest post comes from my polish friend Destany over at Confessions of a Sarcastic Mom. She makes really cool frankens and always does great layering combos.
~~~~~~~Hi everyone! I am so honored to be guest posting here at Refined and Polished! I'm glad to help Lakeisha out as she furthers her studies!
I decided to showcase a simple jelly sandwich today because lately I've been all about them! In case you're wondering about jelly sandwiches (although I know Lakeisha has posted many of them) it's a layering process...mine goes two coats of jelly, one of glitter and then one more of jelly. I know a lot of people use a creme polish as the base and then a jelly for the top coat - there's really no right or wrong way to do it. Just experiment and make it happen how you like it :)
I used OPI Big Hair, Big Nails as my jelly polish and OPI Teenage Dream as my glitter.


I had so much fun doing this post for Lakeisha :) I hope you guys liked it and thanks so much for having me as a guest poster. :)
~~~~~~~~
You all know I love a jelly sandwich and this one is super pretty and sparkly! I think I did one of my first sandwiches with this same polish. I got a few New York Summer jellies in the mail last week and Destany is making me want to do a sandwich stat. Make sure you head over to Confessions of a Sarcastic Mom to check out more from Destany.
Wednesday, June 13, 2012
Guest Post ~ Lola from Burb Beauty
Today's guest post comes from Lola at Burb Beauty. She is one of the first bloggers I started following and I absolutely love her swatches and nail art.
Summertime Nail Art: Swirl Stix Popsicles
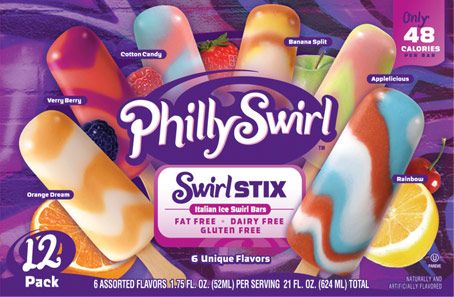
Have you ever tried a Swirl Stix popsicle? I tried one for the first time yesterday, and I can wholeheartedly say that they are gross. However, the color combinations are so fun! My melted, discarded popsicle inspired this bright, shimmery mani.

I'm not sure how close I got to the melted popsicle look, but it is what I envisioned.
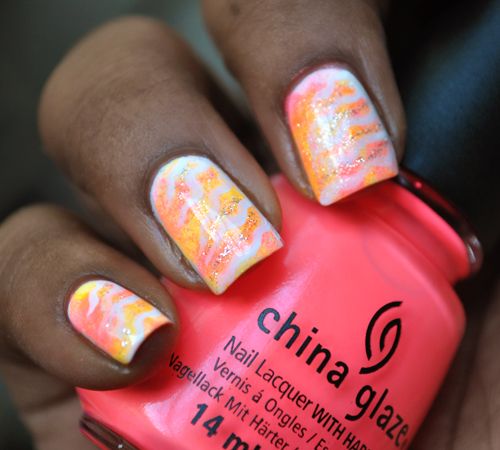
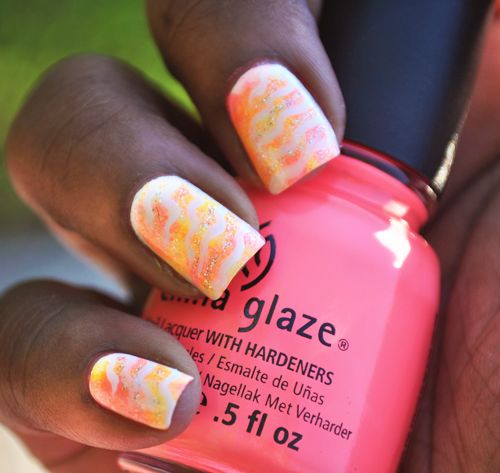
No nail art of mine is complete without my silver glitter striper, so I (probably unnecessarily) accented with that.
Thanks, Lakeisha, for inviting me to do a guest post for your lovely blog! Your invitation motivated me to take a break from frenetically swatching my stash and actually enjoy the art of nail polish again. Best of luck!
~~~~~~~~~~
Lola, this is awesome!!! Now I want to go and get some ice cream (just not the one above since you said it was gross). Make sure you check out Burb Beauty...she's doing a great series called Purge Wars that I absolutely love!
Monday, June 11, 2012
Guest Post ~ Layering from Rebecca of Pandora's Nails
Today's guest post comes from Rebecca over at Pandora's Nails. Her pictures are always so perfect and she is the reason I bought my first A Englands!
~~~~~~~~~~
Hey everyone,
This is my second time guesting at Refined and Polished, and I am so honoured to be asked back to help out while Lakeisha is busy with her studies.
Now anyone who is familiar with my blog knows I am not great at nail art, so I decided to keep it simple. I always love this design when I wear it, so it was the perfect choice for me.
I started off with a base of a-england Guinevere. Here is 2 coats with no top coat.

I then painted 2 coats of Orly Fowl Play across the nail in a diagonal. This was done free hand, so the line isn't as straight as it could have been using tape, but I was quite happy with the result. I finished it all off with 1 coat of the Shield.

And here is a close up so you can see all the pretty flakies in Fowl Play.

I hope you like this post, and thank you for having me! <3 xx
~~~~~~~~~
Thanks so much Rebecca! I would've never paired these two colors together, but they look gorgeous. I can't even tell that you free-handed the diagonal lines. Make sure you all check out more great pictures at Pandora's Nails.
Friday, June 8, 2012
Guest Post ~ Tape Manicure from Polish Obsession
Today's guest post is from Marijo over at Polish Obsession. Between blogs and instagram, we've become polish friends!
Hi everyone!! I was so honored when
Lakeisha asked me to do a guest post for her. I'm in love with her blog. She
has such awesome nails and I always look forward to what she'll share with us
next.
When trying to figure out what to do for this post, I tried to come up with something that I knew Lakeisha would like. I
know she likes to toy around with layering polish, as well as nail art, so I
figured I'd do both!

I started off with a coat of Essie All
in one Base, then applied two coats of Heidi's Glow by Brucci. Heidi's Glow is
a lovely pink shimmer that is fully opaque in two coats. I then layered a coat
of Model's Own Indian Ocean on all nails except my ring finger. Indian Ocean is
one of my favorites right now. It's a gorgeous shimmer recently released in the
Beetlejuice collection that shifts from pink to blue. It's very sheer though,
so it's best used for layering.
Finally, after the polish was dry, I taped off my nails
diagonally. On my ring fingers, I added a coat of Indian Ocean and on all the
other nails, a coat of Heidi's Glow. I topped it all off with a coat of Seche
Vite Fast Dry Top Coat.
 |
| Artificial Light |
 |
| Artificial Light |
 |
| Natural Light |
I really liked how this manicure
turned out. It's such a delicate look and I love the colors together.
Thanks so much for taking the time to read this post! I hope
you all like this manicure. Lakeisha, thanks again for having me. I know you're
going to kill your defense!
~~~~~~~~~~~
This is a super cute combo!!! I need Indian Ocean in my life. I've been so busy using striping tape, that I haven't used regular tape for awhile. Thanks for the inspiration Marijo! Be sure to check out her blog for more swatches, layering, and nail art.
Wednesday, June 6, 2012
Guest Post ~ An Accidental Discovery: Tip For a Long Lasting Manicure
Today's guest post comes from one of my real life besties, West from Confessions of a Blog Vixen.

The ultimate quest of any mani-pedi-loving diva is one which lasts. For most, it simply does not happen, hence the invention of gel polish and minx nails. Personally, my polish never makes it past day two without a blemish. Chips on chips on chips! Half of any one nail would practically be bare by the end of day two lol. I've tried every base coat, top coat, middle coat -- anything you can think of. #NoBueno.
Lately, my nails have been looking just a wee-bit dull and I figured I'd buff and shine these bad boys during my next mani-pedi. I stopped by Ulta a picked up Revlon's Crazy Shine. The name of this buffer is right on the money! Anywho, I buff n' shined, groomed, and then painted my nails as usual. Base coat. Polish color. Top coat. A few days later I noticed my polish was still in tact! No chips? What? No way!

The next week I polished again. Same process. This time I switched my top coat from Out the Door to the God forbidden but totally awesome Seche Vite. Again, my polish lasted the entire week. The third go 'round I figured I'd document and share because, hey, I think I've just solved the 8th wonder of the world! The pic below is what my nails looked like on the 4th day. There is noticeable tip wear (which is probably shrinkage from the Seche Vite) and some peeling of the striping tape, but no major chips!
MORE: Splurge or Save: The Fast Drying Top Coat Showdown

I'm not going to pretend to understand the science of this all, but maybe you do!
NAIL COLORS: Revlon Impulsive & Revlon Posh
~~~~~~~~~~~~~
Thanks so much for the guest post bestie! I've never really buffed in preparation for a mani, but I'll have to try it out. By the way...that striping tape looks familiar...I love it! West blogs about natural hair, fashion, and beauty, so be sure to check out her blog.
Monday, June 4, 2012
Guest Post ~ Water Marble from Captivating Claws
Hey Everyone (or should I say "Hey Dolls"?? lol). I'm Jodi from Captivating Claws and I'll be sharing a water marble with you today.. they're kinda my "thing" and when Lakeisha asked me to write a guest post, I knew right away I'd do a marble. So, while Lakeisha's busy getting all smart completing her dissertation, we can all enjoy a fun mani. ;)
An Orly Water Marble:


This is the first time I've used all Orlys in a water marble. I usually stick with OPI or China Glaze, but decided to try something different. For this marble, I started with two coats of a white creme. After that completely dried, I marbled with Orly Wild Wisteria, Lucky Duck, Snowcone and Basket Case. The Orlys definitely didn't spread as well in the water as OPI and China Glaze, but after a few tries, I became more familiar with their formula and the marble turned out quite pretty. I did notice the Orlys have a much shinier finish than any other polish I've marbled with, so that was a plus. All in all this was a fun marble!!
Thanks, Lakeisha, for inviting me to do a guest post. Good luck in all your studies and hurry back with your gorgeous swatches!! :)
~~~~~~~~~~~~
Thanks so much Jodi for the awesome post! You keep amazing me with your water marbling skills. Maybe one day I'll get the courage to try one out. Jodi does water marbles weekly, along with other great swatches and nail art, so be sure to check her out!
Wednesday, February 15, 2012
Pink Wednesday ~ Guest Post on Sweet Sugar
Hi dolls, I have a guest post over on Sweet Sugar using Zoya Happi and Gaia. I'd love for you all to check it out. I was more than pleased and excited when Gwenn asked me to provide this post, so I hope you all enjoy it!
 |
| See post here |
Happy Pink Wednesday!!!
Friday, January 20, 2012
Guest Post ~ Pandora's Nails
Today I'm sharing with you a guest post from one of my favorite bloggers, Rebecca from Pandora's Nails. She takes amazing pictures and is the main reason why I'm having a love affair with a-england polishes!
~~~~~~~~~~~~~~~~~~~~~~~~~~~~~~~~~~~~~~~~~~~~~~~~

 And sometimes I also wear it this way, mattified with Nails Inc Westminster Bridge Matte Effect top coat, 1 coat.

~~~~~~~~~~~~~~~~~~~~~~~~~~~~~~~~~~~~~~~~~~~~~~~~
Wow! Me as a guest poster, I am so honoured and would like to give a big thanks to Refined and Polished for having me.
I had a bit of a difficult time deciding what this post should be about, should it be amazing/complicated/artistic/
So the post I have for you today is a mani I enjoy to wear and always love it when I do, it is simple and easy to do, yet striking.
First we start with a-england Lancelot which is a black polish with a hint of red. This is 2 coats over the Knight (a-england base coat). No top coat.

Then I added 1 coat of Nails Inc Electric Lane Holographic top coat. This is a scattered holo and shown here with 1 coat of the Shield (a-england top coat).


Which way do you prefer Shiny or Matte?
I hope you like my post and thank you again for having me here.
~~~~~~~~~~~~~~~~~~~~~~~~~~~~~~~~~~~~~~~~~~~~~~~~~~~~~~~~~~~~~~~~
This is simple, yet gorgeous...my kind of mani! I really like the way it looks matte. Make sure you check out Pandora's Nails to get more of her gorgeous nails and layering combinations. Thanks Rebecca for sharing with my readers!
Subscribe to:
Posts (Atom)